
Sydeuropeiskt valnötsbröd Povitica


- 1 msk torrjäst
- 1 tsk socker
- 1 tsk vetemjöl
- 0,6 dl (1/4 cup) mjölk
- 2 1/2 dl (1 cup) mjölk ( har själv använd 2 dl mjölk + 1/2 dl grädde)
- 6 msk strösocker
- 1 tsk salt
- 2 stora ägg
- 60 g ( 1/4 cup/0,6 dl) smält smör
- 560 g ( 4 cups/9 1/2 dl) vetemjöl
- den aktiverade jästen
- 500-550 g ( 3 1/2 cups/ 8 dl) ganska grovt malda valnötter ( inga stora bitar men inte finmalet som mjöl)
- 1 1/4 dl (1/2 cup) mjölk
- 1 1/4 dl (1/2 cup/ 115 g) smält smör
- 2 1/3 dl ( 1 cup) strösocker
- 1 tsk vaniljsocker
- 1 ägg
- 1 msk kakao
- Värm mjölken i micron och blanda ihop med de torra ingredienserna till jästen. Plasta in och låt det stå i rumstemperatur ca 5 minuter
- Värm mjölken till degen till ca 43º. Blanda i socker och salt.
- Tillsätt de lätt vispade äggen, den aktiva jästen, smält smör och ca 3/4 delar av mjölet. Blanda tills degen går ihop och släpper kanterna.
- Ta upp degen på mjölat bakbord och knåda tills den blir elastisk och inte klibbar när du rör den. Tillsätt mer mjöl om det behövs.
- Dela degen i två lika stora delar och lägg varje degbit i en lätt oljad bunke. Täck med plastfolje och ställ varmt i rumstemperatur för att dubbla sin volym. Det tog ca 1,5 timmar för mina degar att jäsa färdigt. Förberedd fyllningen under tiden.
- I en skål blanda valnötter med socker och kakao.
- Heta upp mjölk och smör och tillsätt till de torra ingredienserna. Blanda väl.
- Tillsätt ägget och vaniljsocker. Låt fyllningen stå i rumstemperatur tills den ska användas. Ifall den skulle tjockna tillsätt lite mjölk precis innan du fyller brödet.
- Sätt ugnen på 175º. Smöra och mjöla två brödformar.
- Mjöla lätt bakbordet och ta upp den ena degbiten. Kavla till en rektangel, ca 70 X 50 cm. Börja kavla från mitten och utåt. Lyft och dra lite i degen emellan åt så den inte fastnar. Fortsätt kavla tills du får degen så pass tunt att du ser nästan underlaget igenom. Det spelar ingen roll att det inte blir raka kanter.
- När du har kavlat färdigt pensla hela ytan med smält smör och bre på halva fyllningen över hela degen, lämna ev ca 1 cm runt om.
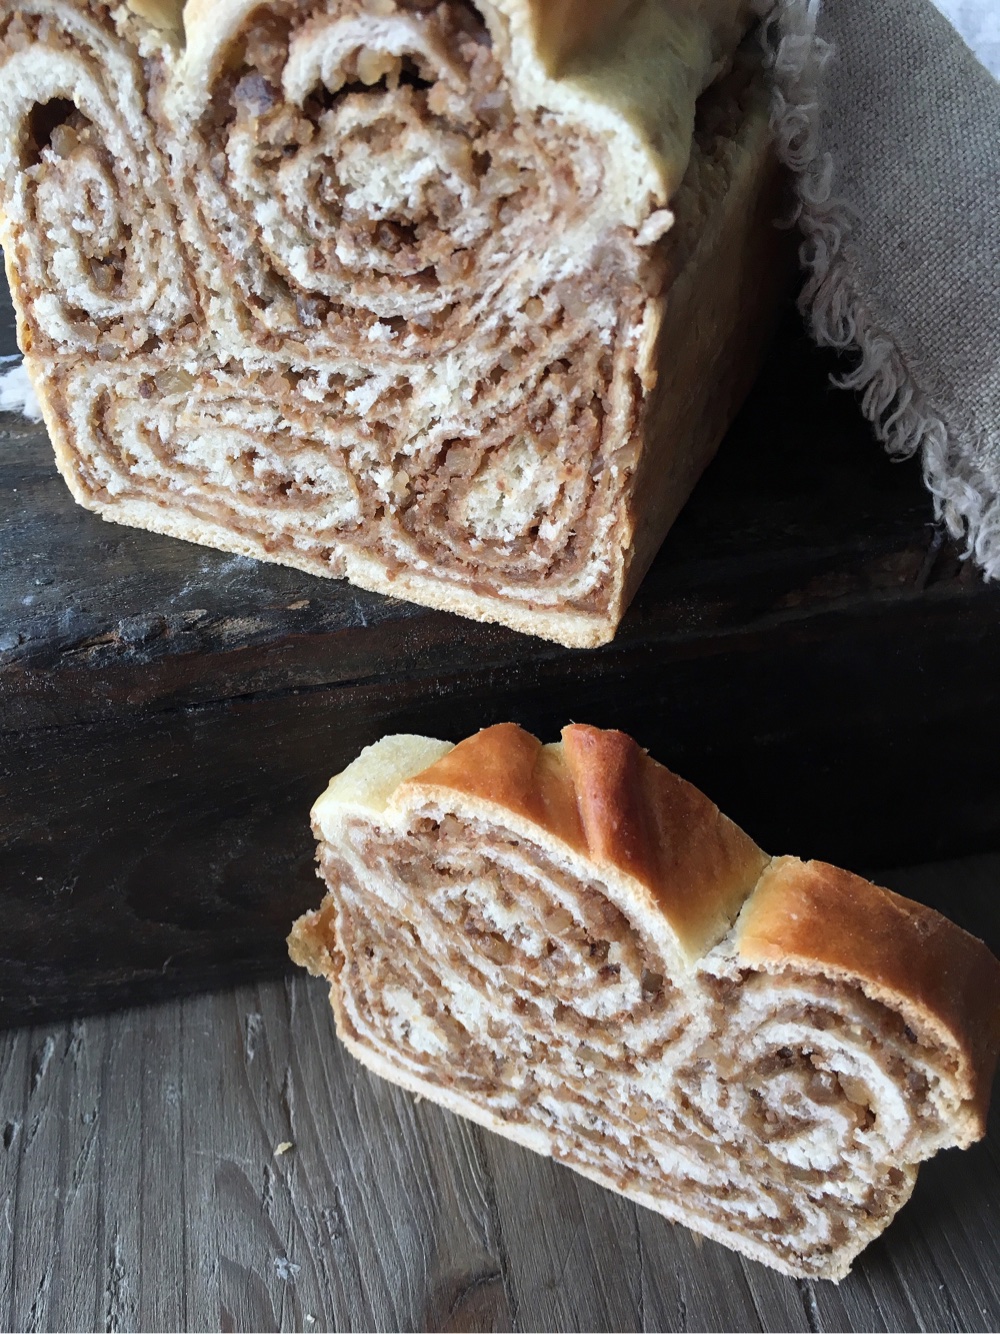
- Rulla degen från den långa sidan, vik på mitten och lägg den i formen som på bilden nedan. Upprepa samma procedur med den andra degbit.
- Låt bröden vila ca 15-20 minuter under kökshandduk innan gräddningen. Pensla ev med uppvispad äggvita.
- Grädda ca 10-15 minuter innan du sänker värmen till 150º. Grädda ytterligare 45 minuter. Jag la över aluminiumfolie över bröden så dem inte skulle brännas på ytan innan dem blev klara. Hade folie på de sista 30 minuterna. Gör som det passar dig och din ugn.
- Ta ut ur ugnen och pensla med smält smör.
- Låt bröden vila i formarna för 30 minuter innan du tar ut dem. Skär i skivor och servera.


Activate the Yeast:
- 1 tsp sugar
- 1 tsp All-Purpose flour
- ¼ Cup (60 ml) warm milk
- 1 Tbsp dry yeast
Allow to stand for 5 minutes.
Dough:
- 1 cup (240 ml) milk
- 6 Tbsp (90 ml) sugar
- 1 tsp salt
- 2 large eggs
- ¼ Cup (60 ml/60 gm) butter, melted
- 4 cups (960 ml/560 g) flour
In a medium saucepan, heat the milk but not boil. Allow to cool , until it is about 110°F/43°C.
In a large bowl, mix the milk, sugar, and the salt until combined.
Add the beaten eggs, yeast mixture, melted butter, and 3 cups flour.
Blend thoroughly and slowly add remaining flour, mixing well until the dough starts to clean the bowl.
Turn dough out onto floured surface and knead, gradually adding flour a little at a time, until smooth and does not stick. Use more or less flour, as much as you need.
Divide the dough into 2 equal pieces (they will each weight about 565 grams)
Place dough in 2 lightly oiled bowls, cover loosely with a layer of plastic wrap and then a kitchen towel and let rise an hour and a half in a warm place, until doubled in size.
Ingredients filling:
- 3½ Cups (560 g) ground walnuts
- ½ Cup (120 ml) milk
- ½ Cup (120 ml/115 g) butter
- 1 egg, beaten
- ½ tsp vanilla extract
- 1 cup (240 ml) sugar
- 1 Tbsp cacao
Heat the milk and butter to boiling.
Pour the liquid over the nut/sugar mixture.
Add the egg and vanilla and mix thoroughly.
Allow to stand at room temperature until ready to be spread on the dough.
If the mixture thickens, add a small amount of warm milk.
Preheat oven to moderate 350°F/180°C.
Spread a clean sheet or cloth over your entire table so that it is covered.
Sprinkle with a couple of tablespoons to a handful of flour.
Place the dough on the sheet and roll the dough out with a rolling pin, starting in the middle and working your way out. Spoon 1 to 1.5 tsp of melted butter on top.
Using the tops of your hands, stretch dough out from the center until the dough is thin and uniformly opaque. You can also use your rolling pin.
As you work, continually pick up the dough from the table, not only to help in stretching it out, but also to make sure that it isn’t sticking.
When you think it the dough is thin enough, try to get it a little thinner. It should be so thin that you can see the color and perhaps the pattern of the sheet underneath. Spoon filling evenly over dough until covered. Use only a half of filling.Lift the edge of the cloth and gently roll the dough like a jelly roll. Once the dough is rolled up into a rope, gently lift it up and place it into a greased loaf pan in the shape of a “U”, with the ends meeting in the middle. You want to coil the dough around itself, as this will give the dough its characteristic look when sliced.
Repeat with remaining loaf, coiling each rope of dough in its own loaf pan.
Brush the top of each loaf with a eggwhites.
Cover pans lightly will plastic wrap and allow to rest for approximately 15 to 20 minutes.
Remove plastic wrap from dough and place into the preheated oven and bake for approximately 10-15 minutes.
Turn down the oven temperature to slow 300°F/150°C and bake for an additional 45 minutes, or until done. You may cover the loaves with a sheet of aluminum foil if you need to. I did it the last 30 minutes.
Remove bread from oven and brush with melted butter.
Remove from the oven and allow to cool on a wire rack for 20-30 minutes, still in the bread pan. Allowing it to cool in the pan helps the loaf to hold its shape.
Slicing with a serrated knife. Enjoy!


Lämna en kommentar
 0
0

